Genie Garage Door Opener Programming Instructions
Here at Genie of Fairview Door Co., our customers have relied on us to help install, set up and reprogram garage door opener systems since 1964! Before you call us, though, you may be able to self-diagnose and solve a hand-held remote programming issue on your own.
Programming Genie Intellicode Remote Transmitters

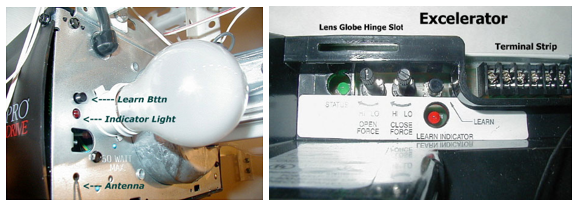
Gently press and release the radio receiver Learn Code button on the Genie of Fairview motor head in your garage. This small, black, usually unmarked button is often located behind the light cover on the motor head and is nearest the 8 inch floppy antenna wire protruding from the head. After pressing this button once, a red indicator light located next to the button will start blinking red for 30 seconds. **
- While the red indicator light is blinking, hold your remote at least three feet away and press the remote button 3 or 4 times to code in remote and start the door moving.
- Perform steps 1 and 2 for each additional remote.
** To erase all Intellicode remotes and wireless keyless entry, gently hold down on the learn button until the red indicator light stops blinking. Proceed to Step 1 above.
For Genie IntelliG, TriloG, SilentMax, Power Max, GPower and PowerLift Series Openers.
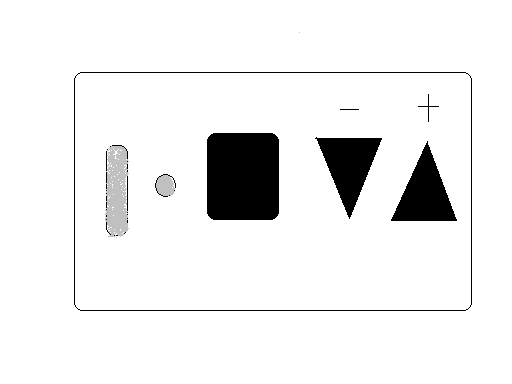
These include models 4024, 3024, 4042, 3042, 4022, 3022, and 4046, 3064, 4062, 3062, 2564, 2562. Looking up at the bottom of the Genie motor head cover in your garage you will see a set of black buttons depicted in the drawing belowalong with two LED lights shown here in grey.

- Press and hold down on the square button on the bottom of your Genie of Fairview motor head until the round blue LED comes on, then release the button.
- The long purple LED light will start to blink purple. ( Note: if the blue light stay on, go to instructions for Intellicode III below)
- While the long LED is blinking, hold the remote 4 or 5 feet away and press 3, 4 or 5 times, until the door activates. Your remote is programmed. Do the same 3 steps for each new remote.
For Genie IntelliG, TriloG Series built from 2009 until July 8, 20011 (Intellicode III)
(see serial # on front: first 2 digits = year, next 3 digits = day of the year)
- Press and hold down on the square button of your Genie of Fairview system until the round blue LED comes on, then release the button. The blue light should stay lit. Press the square button once more and release. The long and short LED lights should start to blink purple.
- To unlock the programming feature use a remote that already operates the unit and press it only once. The LED lights should stop blinking and stay on.
- Hold the new remote 4 or 5 feet away and press 3, 4 or 5 times slowly, until the door activates. This process should be repeated for each new remote.
Programming Genie of Fairview Digital Remote Transmitters with Internal Set Switches

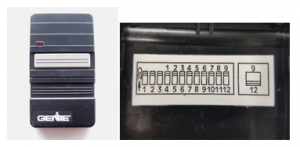
These remotes work by matching the settings on the internal code switches with the radio receiver on the garage ceiling. Look for the floppy 8 inch floppy antenna wire for the location of the radio control receiver . The above diagram shows a GT912 set switch system. The GT90 series would only show the bottom 12 numbers. On the GT912 diagram the wide switch to the right is based on whether your radio receiver in the garage is a 9 switch or 12 switch. If a 9 switch move this wide switch up for 9 and only follow the top nine numbers to match the receiver switches. Note: these remotes will only work the Genie remotes with a frequency of 390.
